I’m going to show you how to create a Google Ads autoresponder. It’s going to auto-nurture your lead, and we’re going to cover everything from start to finish and Google Ads autoresponder will be as easy as a pie for you!
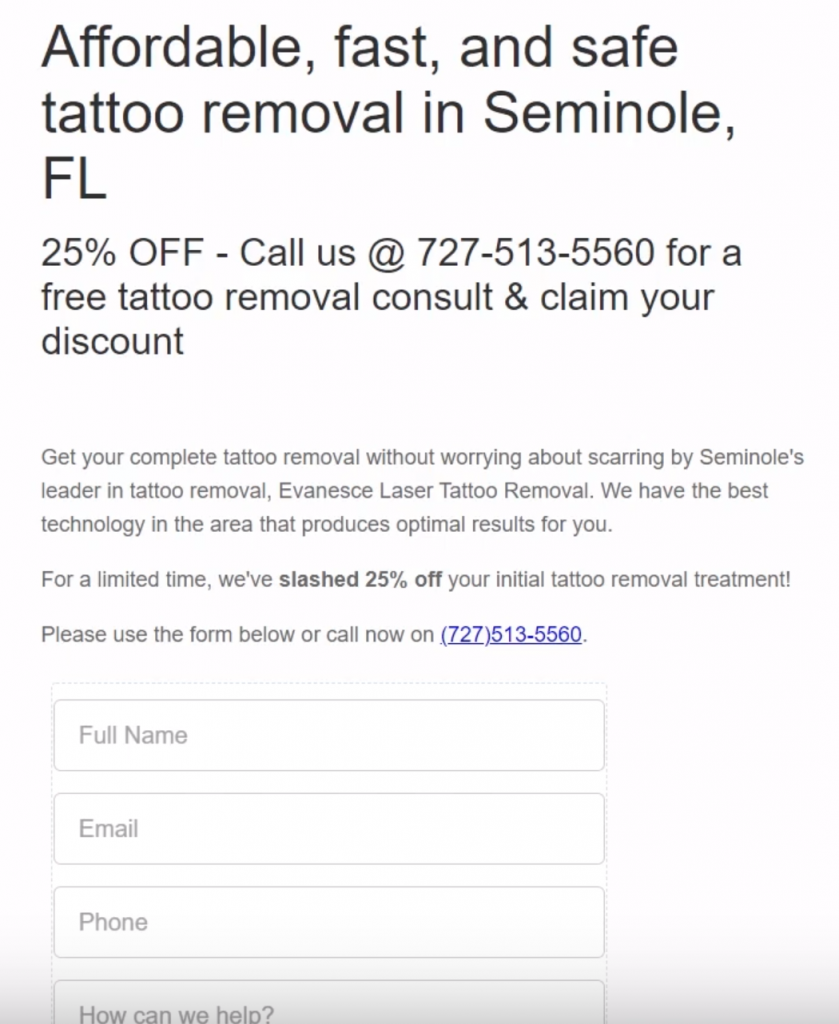
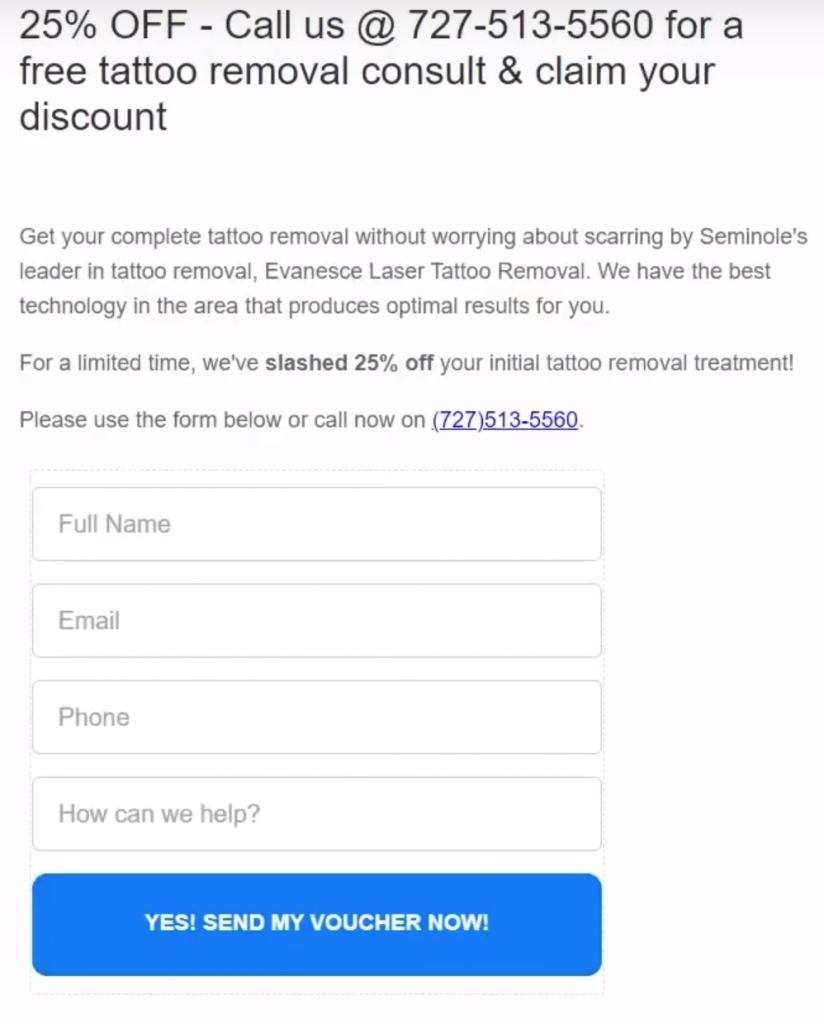
I’m going to teach you how to create a landing page for Google ads that looks like this.

We’re going to cover everything – the forms, triggers and campaigns – to auto nurture your leads so that your client doesn’t feel pressured to call them right back and so that they come back and buy.
Step One: Create Form
We’re going to create a form for the leads to submit their information, and it’s going to look like this.

I’m inside of my HighLevel dashboard here. And if you don’t have an account, what are you waiting for? It’s the all-in-one tool that I use for all of my marketing agency needs.
So, click on Form Builder and click on Create a New Form.
You will want Full Name, Email, Phone Number, and some kind of details, comments or “how can we help?” box. This will increase your quality.
Take the field for Full Name from the right hand panel and drag it over to add it to the form.
Make sure you click Required.
Same with Email – drag Email over and click Required.
Same thing again with Phone Number, and click Required.
Then you can create a custom field with the details. That’s a text field and you fill it in, then you drag it over as like the others.
For your button, make sure that you drag a button over and label it something like “Yes, send my voucher now!” or “Yes, send me more information,” “Text me more information,” – something like that.
I do have a different kind of styling here. Little hack: you can go to Styles > Customs CSS, and you can paste your styling code. This kind of has a Clickfunnels look and feel to it, and it’s super easy to do.
Click on Integrate Form and go ahead and close that out.
Step Two: Setup the Landing Page
We’re going to set up our landing page, and you can easily do this inside of GoHighLevel. You don’t need to pay for hosting and you don’t need to sign up for a hosting plan.
Go to Funnels. Click New Funnel and call it “Google Ads Opt-in” or something like that.
Click Add New Step. The first one is going to be opt-in, and it’s going to be super easy.
So do full width, add one column row, and add a headline.
There’s going to be another section. The top section is for the call, so make sure that you have that so they can call. You can actually hook this up into your number pool, which is going to have to be a different blog post. For now, we will do it this way.
Then we can just put whatever your call to action is, ie, “Affordable daycare in New York City.” You can change the font if you want.
Then add a sub headline. Then add a paragraph. Again, you can type anything you want here. Just make sure that you’re selling the product. Why should they call, right? What kind of deal are they going to get?
Then we will enter our form that we made earlier – mine is the Google Ads Form.
You can add all this other details about the service, how it works, etc. People are going to ask questions, so you might as well put it on this page. You can also put testimonials and stuff in there, which is cool.
So if you want, you can add the testimonial widget down at the bottom, and GoHighLevel has that testimonial widget available.
Save this auto-responder.
I’m going to go back and grab that testimonial quote. Go to Settings > Review Widget > Get Code. Copy the code there.
Go back to Funnels. Click Edit Page. Grab a Custom HTML/Javascript, paste the code into it, and save it.
Make sure that you preview this and that it looks good so far.
Step Three: Insert Tracking Code
Make sure that you insert your Google Analytics code into the Head Tracking Code box. Otherwise if you don’t, then won’t get your performance data.
You can either just end it there, or you can add a Thank You page.
If you want to add a Thank You page, you can add the confirmation code on to it – it would probably be a good idea to do that. You can literally just copy the previous auto-responder and change the verbiage to say thank you.
Step Four: Create a campaign
We’re going to create a Google Ads opt-in campaign.
Go to Add An Event > SMS. We’re going to text them back as soon as they enter that information.
Write, “Hey, {first name}. Thanks for your interest in {niche offer}” – you can use a custom value here, or you can type it. Whatever you do, just make sure that you’re specific here.
OK, “My name is” and then you can insert the business owner name.
“I’ll be calling you as soon as I can. If you’re busy, we can text. Just reply to this message.”
This works really well because it looks like a person. It’s very personable, and if you make it two to four minutes, then it’s not instant, so they don’t think it’s a robot.
Then we’re going to do another text ten hours later.
“Hey it’s {business owner}. Just wanted to check and see if you wanted to get a {offer}” – this is your offer. Again, you can put that in a custom value. I have another blog post on that.
“You can call us back at this number or schedule using the link here:” And you can set up a trigger link. If you want to, I recommend doing that. Again, you can either just put the link there or set up a trigger link which will auto-populate all their information.
Then select something like, 10 hours, and make sure that you put the business hours in. Go back in and select Monday through Friday, 8am to 5pm. If the business owner isn’t there, we don’t want to text because they’ll call back and no one’ll be there to answer the phone.
Then you can do another text, like a day later, and you can write, “Hey, it’s {business owner} again. Did you have any questions for me about the Online Special or {niche} in general? Have a great day!”
All right, so this is going to be after a day and so on. So you can auto-nurture this forever if you want. I don’t recommend doing it forever, but you can definitely auto-nurture as much as you want.
Make sure to turn the “Draft > Published” button on, because if you don’t, it’s not going to work.
Step Five: Create a Trigger
So I’ve got that turned on. I’m going to go into Triggers > Add a Trigger and then I’m going to write in “Google Ads Opt-In”.
Are you seeing a theme here? I’m naming them all the same thing. That way, I know what the heck they are like two years down the road.
Select Form Submitted and then we’re going to specify the form. Select Add To Campaign > Google Ads Opt-In.
We can also do other cool stuff to be organized. We can tag them “Googleads”. We can add them into the pipeline. Do you use pipelines? Let me know in the comments.
You can add them into the pipeline and you can add them into Leads. Or you can add another pipeline for Google ads. Or you can add a pipeline stage for Google ads.
Then put in the lead value. Do you want to count the value when they submit or when they book a call? I’ll leave that up to you and your business.
But you can do Google ads here.
Save it.
We’re going to turn it on and you know that I always say test!
Step Six: Test your Google ads autoresponder!
You’ll notice in the video above I don’t have a domain set up here. So, set up your domain for your funnel and you can click the little arrow symbol to preview everything.
Now for the fun part and see if this form works. Fill in some tester details.
If you want to notify your client, you can add an action and you can choose to send an email or an SMS to your client. You can input their info in the relevant fields they’ll get a text or an email every time someone puts in their info. It’s pretty addictive.
Click through to see if this works.
So the other cool thing about this: If you want to send them to the calendar use action from the form builder. Go back into the form builder, or you can do it in the funnel, either way. Here, when it says On Submit > Open URL, you can paste the link to the calendar in here so that they will book right after they submit their information.
Now, I go check and see if I got these text messages. In the video you’ll see that I didn’t get the text message because there was no Twilio number in the account but I show you how to fix that in the video above too!
So that’s how you set up a Google ads autoresponder inside of GoHighLevel – one tool that you need to run your marketing agency.
Check out the academy if you want to learn more cool things about GoHighLevel!
